The Plan Vault securely houses documents generated in FirmPlus, and other Plan Documents uploaded from your computer. Along with storing documents, you can email documents and reports right out of Plan Vault. Additionally, you can setup direct access for the Plan Sponsor for their own self-service.
- 1
-
Accessing Plan Vault
- Access the Plan List screen by clicking Plan List in the navigation menu at the top of the page.
- Click on a Plan Name.
- Click the hamburger menu icon in the upper left-hand corner next to the FirmPlus logo. The menu will slide in from the left.
- Click the Management option toggle.
- Click Vault and Portal, then Plan Vault in the expanded menu.

- 2
-
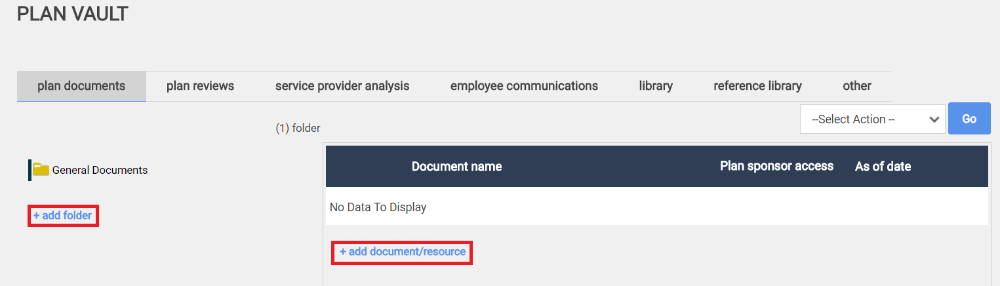
Adding Documents and Folders
Plan Vault gives you the ability to add any number of folders and documents to your Plan Vault.
- Access Plan Vault.
- Click +add folder or +add document/resource.
- When adding a folder, a window will show for you to give a name to your new folder, and click the box to give the Plan Sponsor the ability to view the contents of the folder.
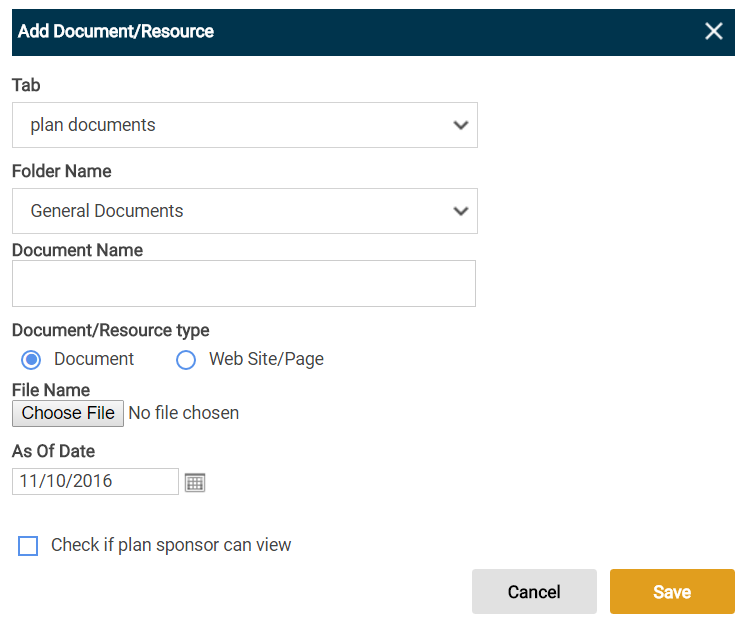
- When adding a document a pop-up window will show where you will:
- Select the Tab you'd like to place the document under.
- Choose which folder to place the document (General Documents or any folder you've added,)
- Give a name for the document.
- Document or Resource Type (Document or Website).
- Upload the document file.
- Check the box to give the Plan Sponsor the ability to view the document.
- Click Save to upload new document/resource.
- 3
-
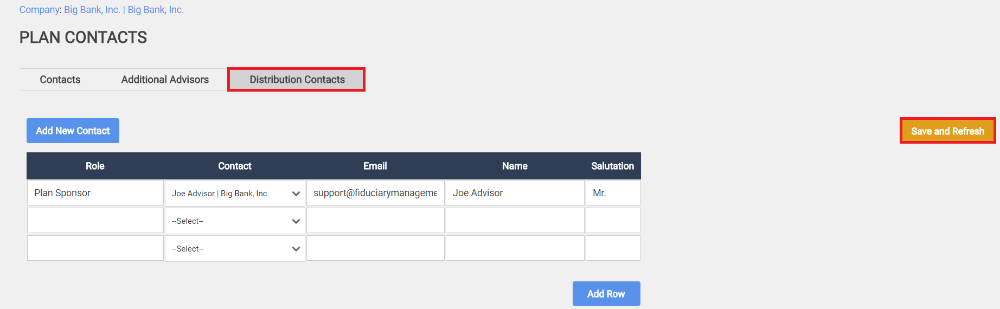
Distribution Contacts
With Distribution Contacts, you can setup direct access for the Plan Sponsor for their own self-service, and other contacts you'd wish to have access to the Plan Vault .
In order for the contacts to show up in Distribution Contacts (where/how you grant them access to the Vault) the contact needs to be added to the Customer contacts in the new CRM tool.
- Access the Plan List screen by clicking Plan List in the navigation menu at the top of the page.
- Click on a Plan Name.
- Click the hamburger menu icon in the upper left-hand corner next to the FirmPlus logo. The menu will slide in from the left.
- Click the Setup option toggle.
- Click Plan Configuration and then Plan Contacts in the expanded menu.
- In the Plan Contacts page, select the Distribution Contacts tab.
- Select the Add New Contact button above the table on the left.
- A window will pop-up, where you will select to use an existing contact or Assign New. Fill out the contact information, select the role of the new contact, and under the Employer section select Use Existing and select the appropriate plan.

Once the contact is created/linked to this plan, when you go to the Distribution Contacts page, then should appear in the drop-down menu for this plan.
- Click the Distribution Contacts tab from the Plan Contacts page.
- From the Distribution Contacts page, in the table under the Contact column, select the appropriate contact you'd wish to include.
- Once you have selected the contact, click Save and Refresh.
- A key icon will show to the right of the contact, click this icon, and a window will show giving you the contacts username and password.
- Click the "Email Access Code to user" link to send your contact a link to the Plan Sponsor Portal along with their login information.