Fee Analysis & Comparison provides benchmarking of total Plan Fees as well as individual fee components to help better understand how fees compare to industry averages.
- Creates a plan-sponsor ready report that discloses plan fees and allows for detailed notes and disclosures for each group receiving compensation for their role in the plan.
- Helps plan sponsor understand the fees that they are paying and how plan complexity and services offered play a role in those expenses.
Setup Fee Analysis & Comparison Report
1
Setup Fund Level Fee Data
Access Fund Lineup
- Click Plan List in the navigation menu at the top of the page.
- Click on a Plan Name.
- Click the hamburger menu icon in the upper left-hand corner next to the FirmPlus logo. The menu will slide in from the left.
- Click the Management option toggle.
- Click Investment Management and then Fund Lineup in the expanded menu.
Enter Fund Level Fees
Fund Level fee data is required in order to accurately capture details related to Revenue Share and other sources of revenue off the fund line-up. 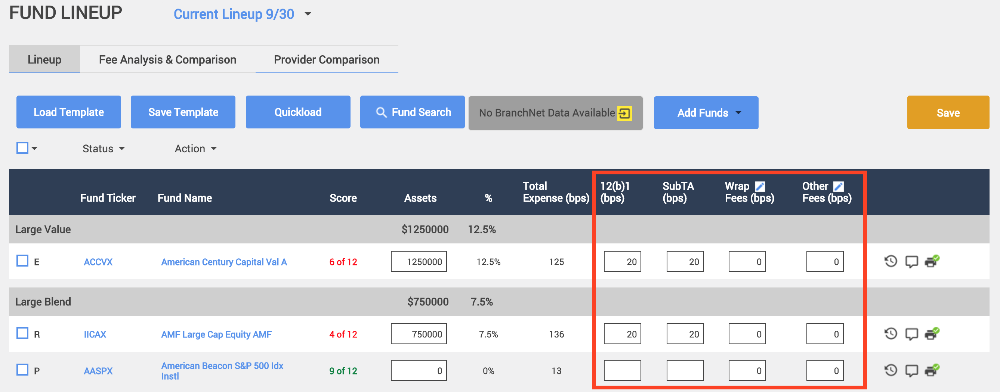
- Enter 12(b)1, SubTA, Wrap Fees, and Other Fees into the appropriate box for each fund in your Fund Lineup. Enter your fee data as whole basis-points.
- You can quickly retrieve 12(b)1 fee data by clicking the Action drop-down button, and clicking Retrieve 12(b)1 Fees.
- You can quickly add the same Wrap Fee or Other Fee to all funds in your Fund Lineup by using our Quick Fill feature. Click the pencil icon next to the fee title, enter a basis-point in the text box, and click Fill.
- Click Save when finished entering data.
2
Setup Ongoing Fee Components
- Click on the Fee Analysis & Comparison tab.
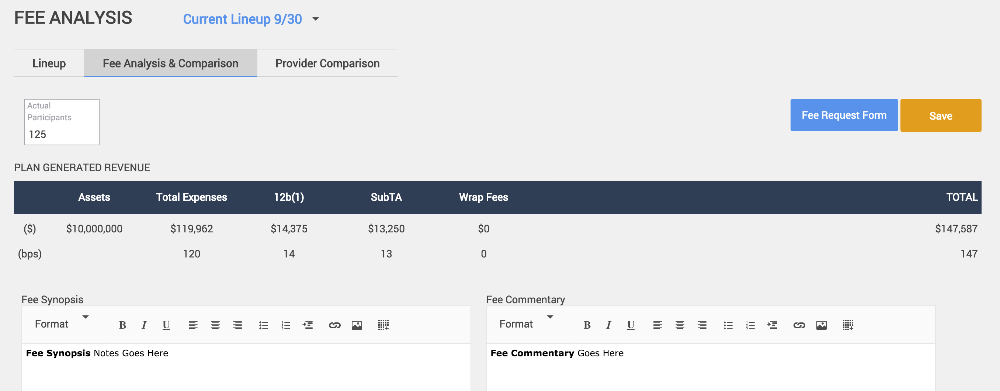
- Enter current participants in the Actual Participants text box.
- The Plan Generated Revenue gives a summary of the Fund Lineup generated revenue based on your inputs in Step 1 above.
- Enter Fee Synopsis and/or Fee Commentary into the appropriate text box as needed.
- Enter Recordkeeper, Advisor, Managed Account Provider, and Other Provider fees based on the fee structure of the Plan.
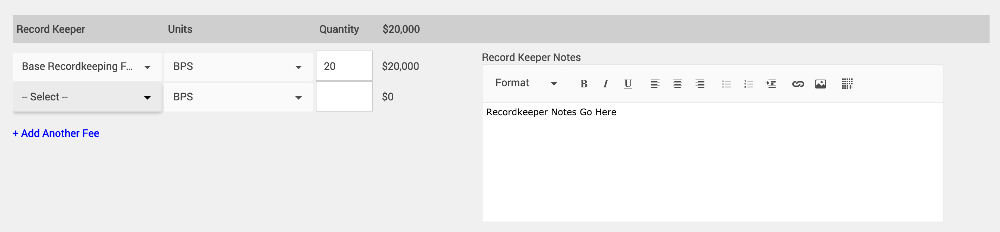
- If you need additional fee title options for a Fee Category, you can create them in Fee Management.
- Click the gear icon in the upper-right hand corner. Click Fee Types Management. From here you can edit Fee Titles
- If you need additional fee title options for a Fee Category, you can create them in Fee Management.
- Enter notes for any Fee Component by adding text to the Note box to the right of the fee items as needed.
- Click Save when finished entering data.
3
Generate Fee Analysis & Comparison Report
- Click the hamburger menu icon in the upper left-hand corner next to the FirmPlus logo. The menu will slide in from the left.
- In the menu click Reports then Fee Comparison.
There are two Report Section lists displayed on the page. The list on the left are Available Report Sections that can be included in your report. The list on the right are Chosen Report Sections that have been selected to appear in the report you generate.You can move sections between lists by clicking on them and using the left/right arrows between the two Report Section lists.
- You can modify the report section ordering in the Chosen Report Sections list by clicking on the section and then using the up/down arrows on the right side of the list to move the report section.
- The last generated Report configuration will default in the Chosen Report Sections list.
- After you are finished organizing you report, click the Generate Report button to generate your Fee Analysis & Comparison Report.
- Reports are produced on demand and can be produced as many times as needed.

- When your report is finished generating a link to View Report will appear. Clicking this link will open/download the report (depending on your web-browser settings).
Report Templates
Report Templates allows you to quickly load a pre-configured Report for any Plan in your account.
- Click on the Report Templates drop-down list at the top of the screen.

- Click on the Template you wish to load. The template will load and the Chosen Report Section configuration will be applied automatically.
You can create a new Report Template based on your selections using the Save as Report Template button. Save Current Configuration allows you to save the choices you’ve made locally to this individual plan.